Putting together a strong Dragon Age: The Veilguard Death Caller build relies on more than just necrotic skills to sap your foes' strength.
Dragon Age: The Veilguard's Death Caller class specializes in buffs for Area-type attacks as well. 즉, 유성 또는 폭풍우와 같은 다른 강력한 주문을 강화하고 괴사 정렬 된 공격에 저항하는 적을 다루는 데 필요한 이점을 제공 할 수 있습니다.
이 드래곤 시대 : Veilguard Death Caller Build Guide는 죽음의 발신자를위한 최고의 기술, 무기 및 마법을 분류하고 수업을 효과적으로 플레이하는 방법에 대한 일반적인 조언을 제공합니다.
이 페이지에서 :
죽음의 발신자는 대부분의 측면에서 정기적 인 마법사처럼 연주하며, 두 가지 전투 스타일 (Stave Plus Orb -and Dagger)과 쿨 다운을 저글링하는 대신 기술을 캐스팅하기위한 마나에 의존합니다. However, the specialization does have a few important differences that could influence which skills you choose. 그것은 면적 유형의 공격에 크게 의존하고 해당 수동적 인 패시브 세트가 있으며, 예상대로, 예상 한 바와 같이, 주요 공격과 원소 버프는 본질적으로 괴로움입니다.
죽음의 발신자의 궁극적 인 시그니처 이동 및 애도 감시자 기술은 모두 괴사하기 때문에 Emmrich를 임무를 수행하면 약간의 겹치게됩니다. His skills are also necrotic, which makes things a bit challenging should you run into enemies with necrotic resistance. Emmrich를 옆에두고 싶다면 전투에 들어가기 전에 무기에 추가 원소 마법을 갖춘 무기를 장착하거나 무기에 비소증 기술을 추가하십시오.
The start of our Death Caller build follows part of the same path as the start of our general Veilguard Mage build . Unlock Fire Wall, and start progressing up the Sustain group toward the Mourn Watch group. If you're struggling in combat with just two fire skills, spend the extra two points to unlock Chain Lightning.
Then, unlock every ability in the Mourn Watch section . 그것은 과도하게 들릴지 모르지만, 그들이 부여하는 버프는 괴사 손상 증가 및 지역 공격의 업그레이드를 포함하여 죽음의 발신자 기술에 완벽하게 맞습니다. Corrupted Ground and Trait: Channeled Thoughts are the standout abilities here, so aim for those first. The former deals necrotic damage in an area and inflicts necrosis, and the latter lets you regenerate Mana while your stave's shield is active. Once you hit Level 20, you can unlock Death Caller's ultimate and its signature skill.
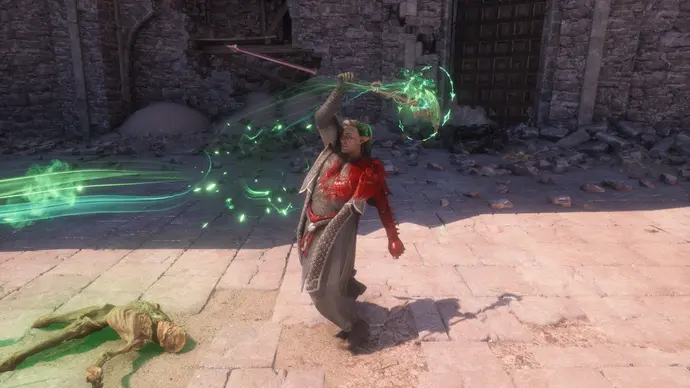
Spirit Bomb 은 Death Caller의 하이라이트, 대상으로부터 에너지를 낳는 강력한 폭발 유형의 기술이며 작은 지역에 영향을 미치는 괴사 폭발을 만듭니다. 사이 폰드 상태는 HP의 일부를 복원하므로 물약이나 동반자의 회복 능력에 의존하지 않고도 HP를 유지하는 유용한 방법입니다. 폭발 업그레이드는 다른 능력의 업그레이드보다 수가 적지 만 Spirit Bomb은 지역 능력으로 계산되므로 영역 노드를 잠금 해제하여 기술을 더욱 증가시킬 수 있습니다 . The Mourn Watch section and the left portion of the Control section have several such nodes.
Death Caller might be your specialty, but you'll have to wait until Level 30 to access its later upgrades. Spirit Bomb의 양쪽에있는 패시브를 잠금 해제하십시오 . 여기에는 지속 시간 업그레이드와 영역 업그레이드가 포함됩니다. 둘 다 손상된 땅에 멋진 부스트를 제공 한 다음 현재 빌드를 강화하는 노드에서 레벨 30에 도달 할 때까지 추가 포인트를 소비합니다.
Level 30을 치면 Soulburn 이외의 능력이 데스 발신자를 제공하고 플레이 스타일을 변경하기 위해 더 많은 능력이 있기 때문에 Death Surge 전에 Soulburn을 잠금 해제하는 것이 좋습니다 . The passive Mortalitasi lets you consume health to cast skills when your Mana runs out. 채널이있는 생각 덕분에 자주 일어나지는 않지만 마나를 지키고 재생할 수없는 위치에 있다면 유용한 비상 도구입니다.
다른 수동적 인 것은 절망이며 , 이로 인해 건강이 떨어지고 목표가 얼마나 많은 건강을 잃었는지에 따라 얼마나 많은 피해를 입 힙니다. It's a risky gambit, but with Spirit Bomb's restorative abilities, you should be able to maintain safe levels of HP most of the time.
The passives after Death Surge are decent - a necrotic buff and turning your ranged attack into a necrotic attack - but inessential. 당신이 그들 모두를 잠금 해제하더라도, 당신은 베일 가드의 최대 수준에 도달 할 때까지 소수의 기술 포인트가있을 것입니다. 일반 마법사 빌드를 따라 전기 공격에 투자하거나 다른 지역 공격에 투자 할 수 있습니다.
However, you could also ditch those options and branch into the Control section. 기본 공격을 통해 적을 얼릴 수 있습니다. 적을 얼릴 수 있습니다. 적을 동결시킬 수 있습니다. 이 주변의 몇몇 수동적 인 사람들은 지역 능력을 향상시킬 것이며, 손상을 입을 때 마나를 회복시키는 고통의 명확성도 있습니다.
제어 능력은 일반적으로 다른 능력보다 약간 약하지만, 많은 적의 군중을 관리하면 어려운 만남이 조금 더 쉽게 다룰 수 있습니다.
Like with a standard Mage build, your actual weapon matters less than the enchantments you put on it. 거의 어떤 상황에서도 특정 원소 정렬을 얻기 위해 약한 무기를 유지하는 것이 좋습니다. 스테이브, 구 및 단검에 동일한 요소를 갖지 않아야합니다.

However, having necrotic damage on one is a decent idea, since the Mourn Watch and Death Caller sections have two necrotic damage buffs. The buffs are small enough to where it's not absolutely essential, though, so don't fret if your strongest weapons aren't necrotic.
Veilseeker is a common-grade necrotic stave, but one that comes with some handy extra bonuses. 첫 번째 수동적 인 공격 피해를 입히는 반면, 첫 번째 수동은 광 공격 손상 (대부분의 시간을 사용하는 공격의 종류)을 증가시킵니다. 두 번째는 체인의 최종 가벼운 공격에 발사체를 추가합니다. Heavy attacks are great, but charging your stave for them takes time. This way, you still deal enough damage with light attacks.

Mourn Watch 평판을 4 위 이상으로 평준화하면 Nevarra 상인의 협상 , 높은 손상 통계, 무거운 괴사 손상 버프 및 우리의 죽음의 발신자가 완벽하게 구축하는 트위스트가있는 독특한 순위의 스테이브입니다. 그것은 50 마나의 비용으로 400 건의 추가 건강을 부여하며, 죽음의 발신자 전문화에서 Mortalitasi와 자연스럽게 적합하고 절망적 인 수동적입니다.
If you want to use a necrotic orb instead, use the Glacial Rod as a complement. It deals ice damage, and its unlockable perks increase your heavy attack damage and add chilled stacks to heavy attacks.
If you do end up using that necrotic orb, make it the Veilsong , which deals extra stagger damage as well.
마법사 나이프 무기는 모두 기본적으로 물리적이지만, 특히 하나는 모든 마법사 빌드에 적합합니다. Treviso의 Crow Merchants의 Spellcaster 's stileto . It gives you additional Mana regeneration with its first passive and extra defense with its second - everything a spellslinger needs.
그러나, 당신의 빌드와 잘 어울리는 특전에 대해서는 붉은 색의 독특한 무기를 확인하십시오. 그러나이 독일을 업그레이드 할 수는 없지만 매혹 될 수 있다는 것을 잊지 마십시오.
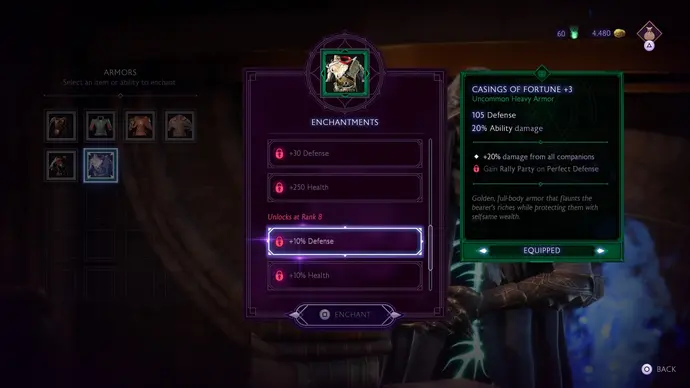
Most Mage armor in Veilguard functions the same, with defense boosts and a secondary stat that increases your ability damage. 죽음의 발신자는 가능한 한 많은 추가 능력 피해를 입을 수 있지만 적들이 동료보다 당신을 목표로하는 것을 보는 것을 보면 높은 방어력도 항상 도움이됩니다. 홀에서 Fortune Heavy Armour의 케이싱을 잡을 수 있습니다. 용맹의 홀에서 높은 방어력과 괜찮은 능력 피해를 입히고 동반자가 거래하는 양을 증가시키는 수동적 인 수동적입니다.
Carastes Double Hat 은 Mana Regeneration 덕분에 초기 및 중간 게임에 대한 확실한 선택입니다.
Like with weapons, don't forget to keep an eye on your red-coloured armor for any perks which fit your build. These armor pieces, again like the red-coloured weapons, can be enchanted but not uprgaded.
괴사 옥은 괴사 손상을 증가시키고 이미 괴사로 고통받는 적에 대한 손상을 증가시키기 때문에 선택한 고리 중 하나 여야합니다. The Paragon's Knuckle is a solid second choice as well, with two defense buffs that help offset the lower defense from your Double Hat.
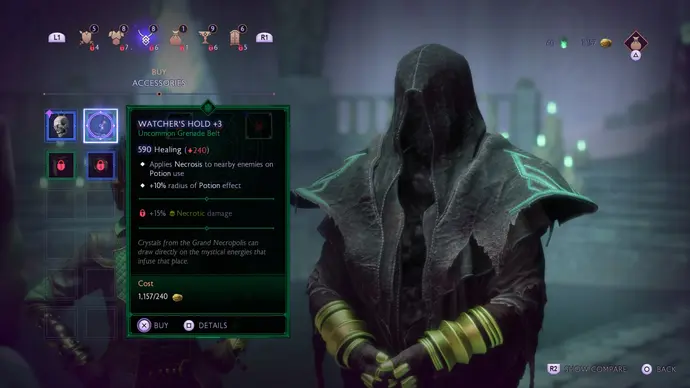
Most belts and wrappings do variations of the same thing, but in Nevarra, you can purchase the Watcher's Hold belt . 그것이 제공하는 추가 치유는 대부분의 벨트에서 얻는 것보다 훨씬 낮지 만 괴사 손상이 증가하고 물약을 사용할 때 근처의 적에게 괴사를 적용합니다. It fits nicely with Necrotic Jade and helps whittle down close foes you might not be targeting.
Finally, for the amulet, you could opt for Sightless Skull , which increases damage from Control abilities.
It's also worth checking to see whether the perks for any red-coloured accessory you collect suit your build. Once again, red-coloured items can be enchanted but not upgraded.
Runes are pretty flexible in Veilguard, but the Diminish rune in particular that works quite well with Death Caller:
The best enchantments will depend on what weapon you're using at the time and what you need in a given situation. 일반 마법사 빌드와 마찬가지로 단검의 +20% 갑옷 손상은 갑옷에 큰 손상을 입히는 데 도움이되며, 스테이브와 오브는 워크숍의 4 위를 잠금 해제 할 때까지 증가 된 손상 수정자를 취할 수 있습니다.
Rank four enchantments are elemental, but it's worth sacrificing a new element for your dagger to put the Arcane Bomb Trigger enchantment on it. Arcane Bomb Trigger increases how much damage you deal when you detonate three Mark stacks, which is always handy. 다른 원소 마법은 특정 원소 약점을 가진 원수에 갇혀있는 경우 유용합니다.
Put +50 Armor Damage on most of your non-necrotic skills to wear down tough foes faster. +Damage is best for Spirit Bomb, and Corrupted Ground should have a critical damage modifier.
Ultimate Generation and Healing Received work well for your armor and helmet. Ultimate energy takes a long time to generate on its own, so every bit helps. 단일 물약이나 동맹국에서 충분한 건강을 회복한다는 것을 알게되면 헬멧과 갑옷에 궁극적 인 생성을 고치고 궁극적 인 에너지를 더욱 높이십시오. 랭크 8 개 마법은 10 %의 방어 또는 건강 부스트로 궁극적 인 세대를 줄이는 것을 보증하기에는 너무 일반적입니다. 따라서 소규모 방어 나 건강 증가가 필요하지 않으면 무시하는 것이 좋습니다.
You can enchant your amulet to increase your abilities' ailment damage or even get an extra potion. 여분의 물약 은 우리의 최고 선택입니다. 동반자가 다른 기술을 사용하기 위해 해방되지만 추가 괴사 손상은 또한 더 많은 물약이 필요하지 않으면 확실한 선택입니다.
Put Mana Regeneration on both rings until you unlock higher ranking enchantments. 그런 다음 한 링에 폭발 손상을 추가하는 것이 좋습니다. 따라서 Spirit Bomb의 피해를 증가시키는 데 도움이되며 다른 하나는 9 개의 마법을 해제하면 +50 마나를 사용할 수 있습니다.
Good luck playing as a Death Caller in Dragon Age: The Veilguard!


